| RRP | $99.99 |
| Price At EF | $5.75 |
There’s a rescue tool built-in Windows 11 to save you from unwanted freezes and when you’re unable to boot. It’s called Safe Mode. The function of Safe Mode Windows 11 is to help load your system in a stripped-down state. Safe Mode operates by shutting down all the other programs or drivers, so you can easily find and fix the problems that cause your system to act strangely.
When you turn on the Safe Mode in Windows 11, you are only loading the most essential files and drivers. There will be no extra programs running on your operating system and it uses minimal graphics with only core parts operating. When you have removed all the possible troublemakers programs from the start-up process, you can now focus easily on finding the root cause of the issue.
When Do You Need Safe Mode Windows 11?
Safe Mode is only related to troubleshooting of your system.
It helps when your PC:
- Keeps crashing
- Displaying error messages
- Running slow after a recent change
Also, if your PC runs fine in Safe Mode, the problem is not with Windows itself but with something added on top. It can be associated with hardware drivers, background services, or any third-party apps that you installed recently.
Common reasons you might need it include:
- There might be a bad driver update causing crashes.
- Newly installed program conflicting with Windows.
- Malware making your system unstable.
- Startup errors preventing normal boot.
Versions of Safe Mode Windows 11
Depending on what you need, there are three versions of Windows 11 Safe Mode.
Safe Mode (Basic)
This is the standard option (Basic). It starts Windows with only the bare essentials. There’s no internet connection, but you can still open files and use core tools. This mode is safest for diagnosing without external threats.
You May Also Want To Read: Windows 11/10 Activation Key Not Working? 12 Tips To Fix
Safe Mode with Networking
This is the same as basic Safe Mode but with internet access. You might use this if you need to download a driver update or scan with an online tool. But be careful in Safe Mode, some security protections are off, making your PC more vulnerable while connected.
Safe Mode with Command Prompt
This skips the normal Windows desktop entirely. Instead, you’ll see a black window where you type commands. This is for advanced troubleshooting and it is often used by IT pros who know specific commands to fix or test the system.
Safe Mode Vs. Normal Startup
In normal mode, your system loads all your programs, run at optimal graphics settings as well as run all start-up programs. That’s great for daily use but bad when one of those extras causes trouble.
The “bare-bones” start-up by Safe Mode Windows 11 environment removes most variables. So you can spot what’s the actual problem.
In Safe Mode:
- Only core drivers and files load.
- Graphics run in low resolution.
- Many startup programs are skipped.
- You’ll see “Safe Mode” written on the screen corners.
How to Start Windows 11 in Safe Mode
You can get into Safe Mode through the sign-in screen or start menu or from Windows Settings. The one you choose depends on whether your PC can boot normally or not.
Sign-in Screen or Start Menu
- Click the Power button.
- Hold down Shift and click Restart.
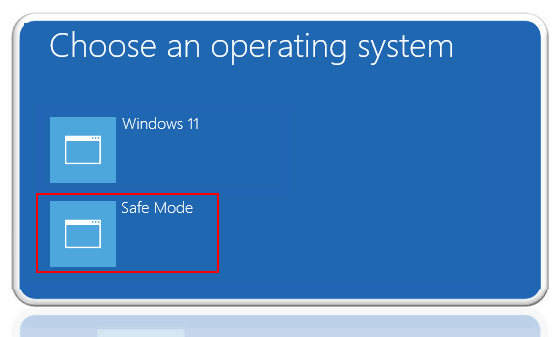
- Your PC will restart and show the Choose an option screen.
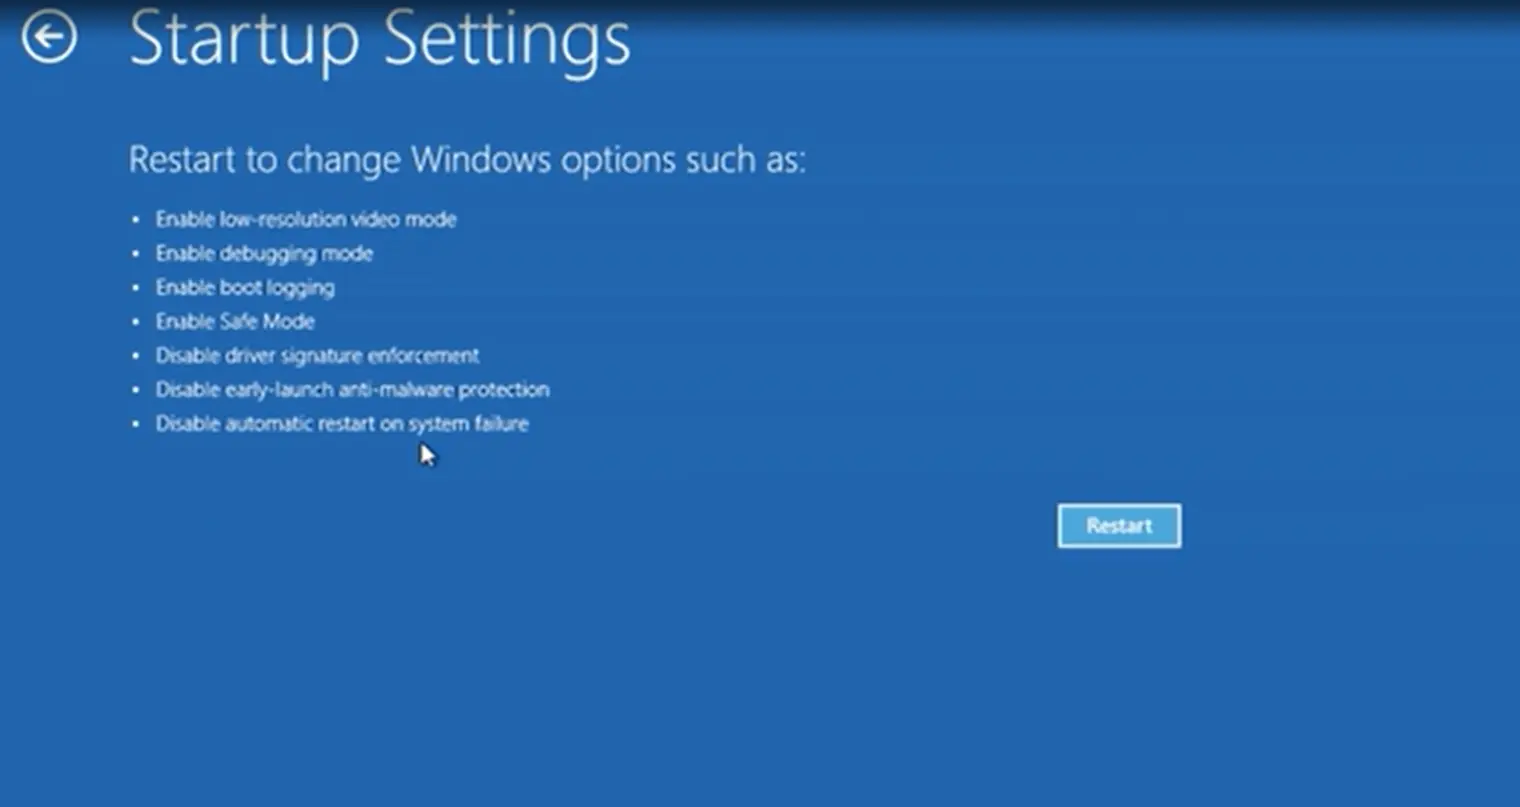
- Select Troubleshoot > Advanced options > Startup Settings > Restart.
- When it restarts again, press:
- 4 or F4 for Safe Mode.
- 5 or F5 for Safe Mode with Networking.
- 6 or F6 for Safe Mode with Command Prompt.
Windows Settings
- Go to Start > Settings > System > Recovery.
- Under Advanced startup, click Restart now.
- Follow the same steps as above once you see the Choose an option screen.
You May Also Want To Read: 5 Key Benefits of Windows 10 Professional
If Windows Won’t Boot Normally
You’ll need the Windows Recovery Environment (WinRE).
- Turn your PC on and off three times in a row using the power button.
- On the third time, Windows should load WinRE’s Automatic Repair screen.
- Select Advanced options > Troubleshoot > Advanced options > Startup Settings > Restart.
- Pick the Safe Mode version you want.
What to Do in Safe Mode
You now have a minimal version of Windows running. If the problem disappears in Safe Mode, you’ve confirmed it’s caused by something that only runs in normal mode.
From here, you can:
- Uninstall recently added programs.
- Roll back or update hardware drivers.
- Scan for malware.
- Use System Restore to go back to a working state.
- Remove or disconnect faulty hardware.
How to Exit Safe Mode Windows 11
Usually, just restart your PC, and it will boot back into normal mode.
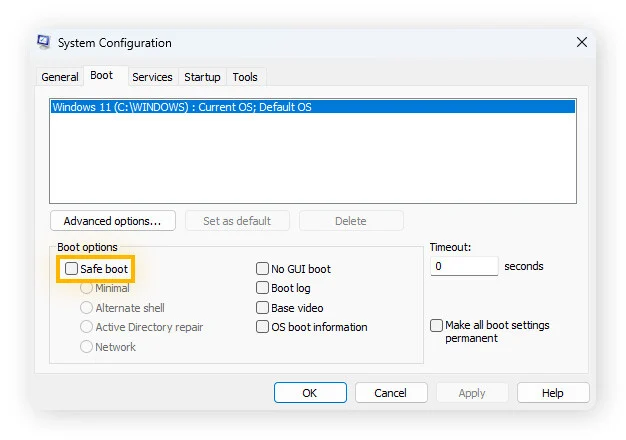
If it keeps starting in Safe Mode:
- Press Windows + R.
- Type msconfig and press Enter.
- Go to the Boot tab.
- Uncheck Safe boot.
- Click OK and restart.
You May Also Want To Read: Windows 10 vs Windows 11
Safe Mode Windows 11 Tips and Tricks
- You can always start with basic Safe Mode unless you need internet access.
- Only use Safe Mode with Networking if you’re certain you need it.
- It’s better to keep track of changes you make during troubleshooting.
- If you remove software or drivers, restart in normal mode to test.
Safe Mode Can’t Fix All Problems
It is powerful, but Safe Mode can’t fix hardware failures or serious corruption in Windows files.
If the system fails to start even in Safe Mode, you may need to:
- Run repairs from a bootable USB with Windows installation media.
- Restore a backup.
- Reinstall Windows entirely.
Bottom Line
Whenever you’re experiencing issues on Windows 11 that you are unable to troubleshoot, the Safe Mode is your first line of defense. It works well for a non-technical person when you’re dealing with serious PC problems. It strips down your system to only the most essential programs so it becomes super easy to get a clear view of the problem and fix it safely.
You can save time guessing what’s causing the issue by booting your system into Safe Mode Windows 11. You can pinpoint the cause and thus fix it before it stops from using your system.

Zaryab Shafiq
Zaryab Shafiq is a gamer and tech-fan with a strong background in computer engineering. He began his career as a freelance content writer at Electronic First, where he has been creating in-depth gaming and technology content since 2023, later transitioned into a full-time SEO expert role. With a deep interest in gaming consoles, PC hardware, and the latest tech trends, Zaryab covers everything including guides and reviews to tips & tricks, and industry insights. His favourite games include Valorant, PUBG, CS:GO, Call of Duty, and other competitive FPS titles. His mission is simple: To explore the most exciting developments in the gaming and tech world and make them easy to understand for everyone.